Using Video Masks to Create Animated Assets in Enscape
In a prior blog post, we discussed leveraging masking with black and white images to create cutouts on pumpkins. That blog post can be found here. Since then, we have leveraged that same method in creating animated assets using black and white videos for cutout/transparency masks. We ran into a challenge. While Enscape supports .mp4 files used as albedo textures, Enscape doesn’t natively support .mp4 files for the cutout/transparency textures of a material within the custom asset editor. We needed to force Enscape to use the video file, but without using the custom asset editor. After trial and error, we found a solution.
We learned we can manually edit our .glTF files in a text editor (such as Notepad, Notepad++, or Visual Studio Code) after saving them in the custom asset editor. We realized that we can use this as a workaround to the custom asset editor, knowing that when we save a custom asset with textures, it stores those textures in the same folder with the .glTF. So we import our asset and assign it placeholder images for color and/or cutout/transparency in the custom asset editor. When we open our .glTF file, we can find references to these textures that are stored in the folder under a section called “images”. We added our video files for color and cutout/transparency into our exported asset’s folder and edited the references in our .glTF file under images to redirect them to those video files.
There are drawbacks to this workaround. If you edit our animated asset in the custom asset editor after doing this workaround, you will need to copy and paste the video files into the folder again and edit our .glTF to rebuild the texture reference, making the animation work again. This procedure is made complicated by the fact that Enscape will regenerate our asset’s folder. Consequently, the video files that were previously in our folder referenced in the .glTF are destroyed. Manual re-addition of these files is therefore necessary.
For demonstration purposes, let us break down how to fix our asset if it were edited and saved in the custom asset editor, as well as go over how to edit the .glTF with material changes without the Custom Asset Editor.
Before we begin, formatting and syntax in this file are critical to preserve. Editing our glTF improperly can result in your asset not rendering correctly or at all. Make sure you do not delete commas, semicolons, and are reusing the existing structure as it is presented. First, let’s go over repairing one of our assets if it were reopened, edited, and saved in the custom asset editor. We’ve prepared a short tutorial video as well.
Begin by opening the folder included with this kit titled ENS_AnimExperiment_VideoEffects_SourceVideos, which contains all the original video files. Copy the videos that correspond to our asset that need to be remapped.

Next, navigate to the folder corresponding to our asset that was saved. Paste the required .mp4 files that were just copied from the source folder into this subfolder so that they are alongside the .glTF file.
For this example, the asset should be saved in a location that looks like this:
\CustomImportLibrary\VideoEffect_Fireworks_A_8616c066-69ad-488ea988-6ba42c5df312\8616c066-69ad-488ea988-6ba42c5df312

Now that the videos are in the folder with the .glTF, we need to edit the .glTF to direct the material to use them. To do this, right-click the .glTF and open it with a text editor (Notepad, Notepad++, Visual Studio Code).
(Make sure you are selecting the correct .glTF. Disregard the _phys.glTF)
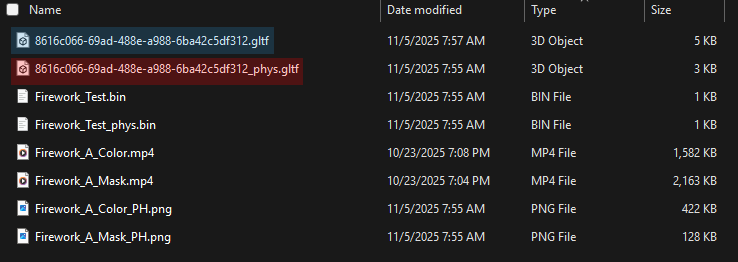

Within this file, we need to find where it stores the texture references. To do this, we can press “Ctrl+F” to search and type in images in the search bar.

Here we can see the texture references listed out in an array. The first slot usually is the color, and the second slot is the cutout transparency. In some of our assets, we only use cutout/transparency, so the first slot in these assets will not be color and instead be that black and white video used for cutout/transparency. To remap the textures, change their names to match the corresponding names of the video files. Make sure you change .png to .mp4 so the .glTF knows it is a video file.
This action transforms:
Firework_A_Color_PH.png
Firework_A_Mask_PH.png
Into:
Firework_A_Color.mp4
Firework_A_Mask.mp4

Finally, save the file “Ctrl+S” and return to Enscape to confirm that the animation is functioning correctly.
In order to avoid doing this when we want to change the color of our asset, we can also make material adjustments in this text file. To start doing this, we need to right-click our .glTF and open it with your text editor of choice. The changes we would want to make are going to be in the materials section of this file. Let us search using “Ctrl+F” for materials in the search bar.
If we want to change the color of an asset, we need to look for albedocolor. These values are broken down to three colors and an alpha that combine to give the final color in Enscape.
Here’s a list breaking down each component:
Red: The first value controls the intensity of the red color component.
Green: The second value dictates the intensity of the green color component.
Blue: The third value manages the intensity of the blue color component.
Alpha (Transparency): The fourth value governs the object's transparency. A value of 1.0 indicates complete opaqueness, while a value approaching 0.0 means increasing transparency.
In the provided example, the first three values (red, green, and blue) are all set to 1.0. This combination results in a pure white color. When you apply a texture to an object to define its color, it is generally recommended to set the base albedocolor to white. This ensures that the texture's colors are displayed accurately without being tinted by a base color.

The last value “alpha” in this specific example is set to 0.94. This means the object is slightly transparent. It's important to note a specific threshold in Enscape regarding transparency. When the alpha value is set to 0.94 or higher, or if an emission value is applied, Enscape will switch from using a "transmittance mask" to a "cutout mask" for rendering. This change in masking behavior can significantly affect how transparency and light interaction are displayed on the object, particularly for elements like foliage, fences, or patterned surfaces, where precise control over masked areas is crucial. Understanding this distinction is vital for achieving the desired visual effects in your Enscape renderings.
In some cases, you may have a texture designed (usually white) to have color applied to it, also known as a tint color. You can edit that color right below in tintColor.
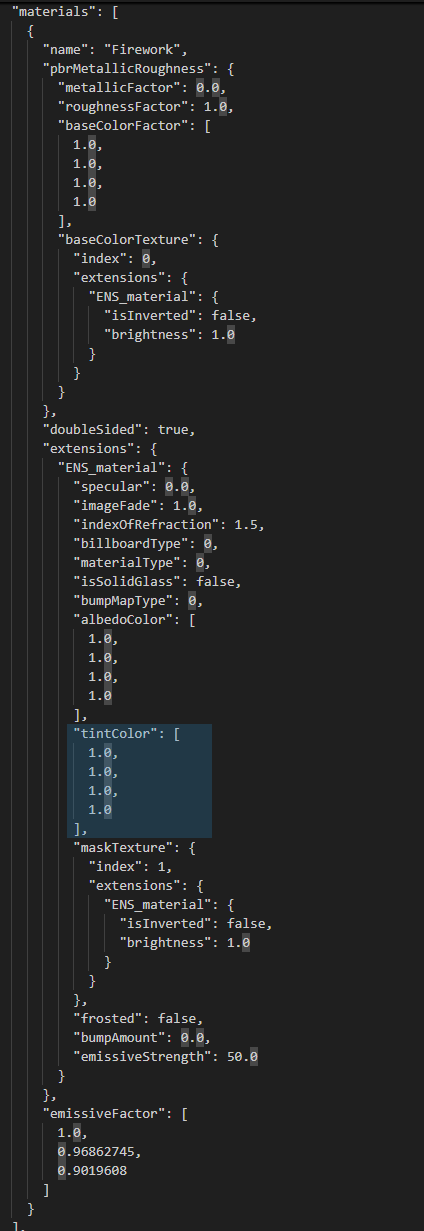
You can also edit the roughness, metallic, and specular of our asset by changing the roughnessFactor, metallicFactor, and specular respectively.

If our asset is designed to have emission, you can change the intensity of the emission by adjusting emissiveStrength and the color by adjusting emissiveFactor.

Again, formatting and syntax in this file are critical to preserve. Editing the .glTF improperly can result in your asset not rendering correctly or at all. Make sure you do not delete commas, semicolons, and are reusing the existing structure as it is presented. Only adjust the values, do not add or remove commas, create new lines, or remove/adjust any other syntax.
If you have any questions, comments, or concerns please reach out to us through our FAQ page at bim kits, or send us an email at support@readthomas.com.